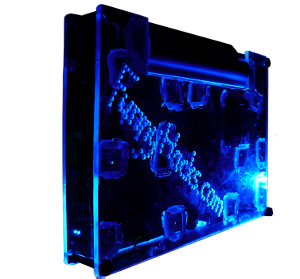
This is one of my more impressive looking builds. Not the most complex by any means, but it certainly looks cool. Where ever I take it, I get lots of people gathering around wanting to know what it is. You'll notice the green one sitting in the background. That's the prototype. More on that in another post!
It began life as an Asus EEE 701 and that has been quite a hard life at that. It's held up remarkably well, and so now it was time to make it into a tablet.
I'm pretty sure this is the touch panel I used. Basically you just want a 7" touch panel kit that includes the driver board and any necessary cables. The touch panel is essentially a transparent rectangle that sits in front of a traditional display, which means you can use your existing LCD. I really want to try a capacitive touch panel on the next iteration so I can do more complex gestures.
This page has a really good link to this video for doing the touch screen. There's lots of ways to calibrate a touch screen. I'll do another post detailing the way the worked well for me.
I wanted to keep my USB ports free. So I sacrified one to drive a generic USB hub (I thought I got a good deal until I looked at that page!). This hub is powered using instructions on this page so that it (and thus anything attached to it) will turn off when the device is in standby. For wiring things up in a compact way, check out the wikipedia USB page.
A 5mm thick sheet of perspex. Really this could be any material you want to mount everything in. I chose perspex because I like the look of it, and it's been nearly a couple of decades since I last worked with it.…. Now that makes me sound old! I initially chose 5mm because I wanted to be able to drop it and it be likely to come out fairly unscathed.… So far, so good, but the 3mm would probably have also been pretty good. Where the 5mm really excels is that it is viable (difficult) to drill into it on the side and place a 3mm LED to make it light up in cool ways.
It's also worth considering that perspex is also great for gathering static electricity. So far everything is working fine. But it may be that this doesn't last particularly long.
Superbright LEDs. These are fun. You can get them from your local electronics store (not "electronics" like HI-FI stereos, but actual electronics). Make sure you use Superbright LEDs, otherwise you'll be in for disappointment. I'll do an episode on mounting these further down the track.
Nuts, Bolts and Washers. I chose M5. Get these from your local hardware store (it took me far too long in life before I went to a hardware store. Go take a look, there's so much potention for awesome!) The washers are important as they help prevent the nuts from coming undone. I use the term washer loosly, in my case I used rubber grommets which help keep things tight, but also add a little impact protection.
Where ever possible, I tried to mount the circut boards to pillars I had made using their original screws.
In my case, I used the KDE spin of Fedora 16. But Mac and Windows are also very capable these days :P
I wanted one and wanted to work through the challenges of making one. It's easy to say what you would do. But quite another to actually do it.
More to come. But now I need to go and meet some friends! :D
There's loooooooooots of information about the net for hacking the Asus Eee PC 701. Here are a few that I found really helpful:
From a quick search, I found this one. It's interesting to see that they've gone in quite a different direction. I haven't found any others though. If you have done something similar, feel free to put it as a video response.
Above: Imported image from the old system
Above: Imported image from the old system
Above: Imported image from the old system
Above: Imported image from the old system
Above: Imported image from the old system
Above: Imported image from the old system
Above: Imported image from the old system
Above: Imported image from the old system
Above: Imported image from the old system
Above: Imported image from the old system
Above: Imported image from the old system
Above: Imported image from the old system
Above: Imported image from the old system
Above: Imported image from the old system
Above: Imported image from the old system
Above: Imported image from the old system